Video #49885 · Screen Recording
Premiere Pro audio mixing tutorialfrom @mehto
The creator demonstrates a professional audio mixing workflow for vocals in Adobe Premiere Pro. They first show the common mistake of manually adjusting individual clip volumes, then present a step-by-step solution involving highlighting all clips, using the 'Auto-Match' loudness feature, and applying a chain of effects in the Audio Track Mixer: Parametric Equalizer, Multiband Compressor, and Hard Limiter, each with specific presets and adjustments.
- 1Expose common inefficiency
- 2Demonstrate sequential solution
- 3Reveal perfected outcome
- 4Prompt future reference
ConceptsTutorial / How ToGood vs BadPlaybook
ElementsScreen RecordingText OverlayTitle Text HookMood Music
[05]
Hook analysis
What stops the scroll in the first 3 seconds
Title hook
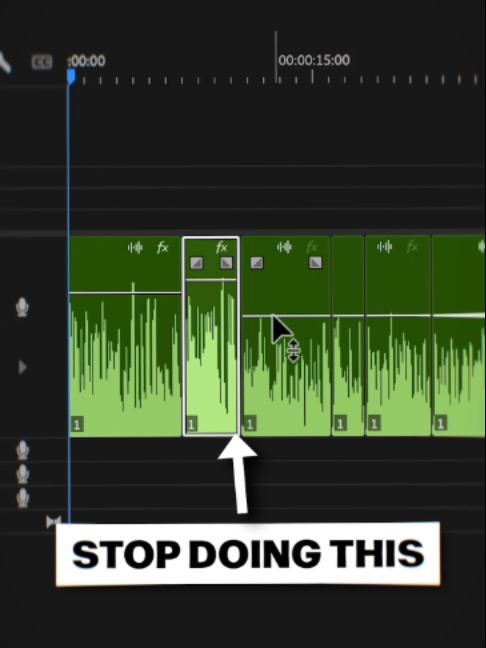
STOP DOING THIS
Visual hook
A screen recording of an audio editing timeline with a large white arrow pointing to manually adjusted clips, creating immediate problem identification.
[07]
Hook and payoff
The promise the opener makes, and how the video pays it back
Hook
Visually demonstrates a common, inefficient, or incorrect process, framed as a mistake the viewer should stop making.
Payoff
Provides clear visual proof of the superior result, confirms the process's success with a definitive statement, and includes a direct call to action to save the content for future reference.
[08]
Narrative framework
The structural pattern this video runs on
Framework
The Expert Workflow Blueprint
Exposing a common, inefficient method and replacing it with a rapid, multi-step expert process that leverages presets or shortcuts to achieve a professional result.
- 1
The 'Better Way' Pivot
A hard visual and textual transition that dismisses the old method and introduces the new, superior one.
- 2
Step 1: The Foundational Fix
Demonstrates the first and most crucial step of the new process, which establishes a consistent baseline for the entire project.
- 3
Step 2: The Clarity Layer
Applies a second effect or technique focused on enhancing the clarity and definition of the subject.
- 4
Step 3: The Control Layer
Applies a third effect or technique focused on managing dynamics and adding professional polish.
- 5
Step 4: The Safety Layer
Applies a final effect that acts as a safeguard, preventing errors and maximizing the final output.
Themes
- Skill improvement
- Efficiency
- Professionalism
Techniques
- Screen recording
- Text overlay
- Fast-paced editing
Trends
- Problem-solution format
- Quick tutorial
Post caption
STOP Mixing Audio Wrong 😵💫
Here's how to get the perfect mix for voices:
Highlight all the vocal clips and go to Essential Sound and hit the Auto-Match button under Loudness.
Go to the Audio Track Mixer panel and add the following effects to the layer with your audio on:
Parametric Equalizer with the Vocal Enhancer preset.
Multiband Compressor with the Broadcast preset. Turn the Thresh down to -7dB.
Hard Limiter with the Limit to -3dB preset.
Enjoy!
#adobepremiere #videoediting #soundmixing
Text overlays
title · beginning
STOP DOING THIS
title · beginning
DO THIS INSTEAD
informational · middle
Highlight Clips
informational · middle
Go to Essential Sound
informational · middle
Loudness -> Auto-Match
informational · middle
Go to Audio Track Mixer
informational · middle
Add Parametric Equalizer
informational · middle
Vocal Enhancer preset
informational · middle
Add Multiband Compressor
informational · middle
Broadcast preset
informational · middle
Change Thresh to -7dB
informational · middle
Add Hard Limiter
informational · middle
Limit to -3dB preset
informational · end
Perfect mix every time!
call-to-action · end
Save this for later :)
Transcript
She don't believe in shooting stars, but she believe in shoes and cars. What's the laws in the new apartment?